Monday, May 22, 2023

Oracle Exadata Database Service on Cloud@Customer


Oracle Exadata Database Service on Cloud@Customer

Get Started

Oracle Exadata Database Service on Cloud@Customer combines cloud simplicity, agility, and elasticity with deployment inside your data center to provide full-featured Oracle Database instances hosted on Oracle Exadata Database Machine.

Oracle Exadata Database Service on Cloud@Customer On Premises server deployment and infrastructure administration.

To obtain additional information about the features and management of databases on Oracle Exadata Database Service on Cloud@Customer, which is deployed using Oracle Cloud Infrastructure management APIs, you can access the latest documentation for Exadata and Oracle Database management using the Oracle Cloud Infrastructure Console, the application programming interface (API), or the command-line interface (CLI).

To prepare your data center and administer your Oracle Exadata Database Service on Cloud@Customer server, use the menu to locate the information that you require.


Prepare to Oracle Exadata Database Service on Cloud@Customer On Premises

Sunday, May 21, 2023

How to resize ASM disks in Exadata

 How to resize ASM disks in Exadata 


The ASM disks in Exadata are provisioned as griddisks from Exadata storage cells. The griddisks are created from the celldisks. Normally, there is no free space in celldisks, as all space is used for griddisks, as seen in this example from storage cell 1:

# cellcli -e "list celldisk where name like 'CD.*' attributes name, size, freespace"
CD_00_exacell01 528.734375G 0
CD_01_exacell01 528.734375G 0
CD_02_exacell01 557.859375G 0
...

This document shows how to free up some space from the griddisks in RECO disk group, and then reuse that space to increase the size of disk group DATA.

Free up space on celldisks

To free up some space, say 88 GB per disk in disk group RECO, we need to reduce the disk size in ASM, and then reduce the griddisk size in Exadata storage cells. Let's do that for disk group RECO.

We start with the RECO griddisks with the size of 316.6875 GB:

# cellcli -e "list griddisk where name like 'RECO.*' attributes name, size"
RECO_CD_00_exacell01 316.6875G
RECO_CD_01_exacell01 316.6875G
RECO_CD_02_exacell01 316.6875G
...

To free up 88 GB, the new griddisks size will be 316.6875 GB - 88 GB = 228.6875 GB = 234176 MB.

Reduce size of RECO disks in ASM

Resize all disks in disk group RECO in ASM:

$ sqlplus / as sysasm

SQL> alter diskgroup RECO resize all size 234176M rebalance power 32;

Diskgroup altered.

SQL>

The command will trigger the rebalance operation for disk group RECO.

Monitor the rebalance with the following command:

SQL> select * from gv$asm_operation;

Once the command returns "no rows selected", the rebalance would have completed and all disks in disk group RECO should show new size.

SQL> select name, total_mb from v$asm_disk_stat where name like 'RECO%';

NAME                   TOTAL_MB
---------------------- --------
RECO_CD_11_EXACELL01 234176
RECO_CD_10_EXACELL01 234176
RECO_CD_09_EXACELL01 234176
...
RECOC1_CD_03_EXACELL03 234176

36 rows selected.

SQL>

Reduce size of RECO disks in storage cells

Resize the RECO griddisks on all storage cells. On storage cell 1, the command would be:

# cellcli -e alter griddisk RECO_CD_00_exacell01, RECO_CD_01_exacell01, RECO_CD_02_exacell01, RECO_CD_03_exacell01, RECO_CD_04_exacell01, RECO_CD_05_exacell01, RECO_CD_06_exacell01, RECO_CD_07_exacell01, RECO_CD_08_exacell01, RECO_CD_09_exacell01, RECO_CD_10_exacell01, RECO_CD_11_exacell01 size=234176M;

GridDisk RECO_CD_00_exacell01 successfully altered
GridDisk RECO_CD_01_exacell01 successfully altered
GridDisk RECO_CD_02_exacell01 successfully altered
...
GridDisk RECO_CD_11_exacell01 successfully altered
#

Repeat the above resize on all storage cells.

Now we have some free space on celldisks (show here on storage cell 1):

# cellcli -e "list celldisk where name like 'CD.*' attributes name, size, freespace"

  CD_00_exacell01 528.734375G 88G
  CD_01_exacell01 528.734375G 88G
  CD_02_exacell01 557.859375G 88G
...

#

Increase size of DATA disks in storage cells

We can now increase the size of DATA griddisks, and then increase all disks size of disk group DATA in ASM.

The current DATA griddisks size is 212 GB:

# cellcli -e "list griddisk where name like 'DATA.*' attributes name, size"

  DATA_CD_00_exacell01 212G
  DATA_CD_01_exacell01 212G
  DATA_CD_02_exacell01 212G

...

The new griddisks size will be 212 GB + 88 GB = 300 GB.

Resize the DATA griddisks on all storage cells. On storage cell 1, the command would be:

# cellcli -e alter griddisk DATA_CD_00_exacell01, DATA_CD_01_exacell01, DATA_CD_02_exacell01, DATA_CD_03_exacell01, DATA_CD_04_exacell01, DATA_CD_05_exacell01, DATA_CD_06_exacell01, DATA_CD_07_exacell01, DATA_CD_08_exacell01, DATA_CD_09_exacell01, DATA_CD_10_exacell01, DATA_CD_11_exacell01 size=300G;

GridDisk DATA_CD_00_exacell01 successfully altered
GridDisk DATA_CD_01_exacell01 successfully altered
GridDisk DATA_CD_02_exacell01 successfully altered
...
GridDisk DATA_CD_11_exacell01 successfully altered

# cellcli -e "list griddisk where name like 'DATA.*' attributes name, size"
  DATA_CD_00_exacell01 300G
  DATA_CD_01_exacell01 300G
  DATA_CD_02_exacell01 300G
...

#

Repeat the above resize on all storage cells.

Increase size of DATA disks in ASM

Increase the size of all disks in disk group DATA, with the following command:

$ sqlplus / as sysasm

SQL> alter diskgroup DATA resize all rebalance power 32;

Diskgroup altered.

SQL>

Note that there was no need to specify the new disks size, as ASM will get that from the griddisks. The rebalance clause is optional.

The command will trigger the rebalance operation for disk group DATA.

Monitor the rebalance with the following command:

SQL> select * from gv$asm_operation;

Once the command returns "no rows selected", the rebalance would have completed and all disks in disk group DATA should show new size:

SQL> select name, total_mb/1024 "GB" from v$asm_disk_stat where name like 'DATA%';

NAME GB
------------------------------ ----------
DATA_CD_02_EXACELL01 300
DATA_CD_09_EXACELL01 300
DATA_CD_07_EXACELL01 300
...
DATA_CD_06_EXACELL03 300

36 rows selected.

SQL>

Conclusion

If there is free space in Exadata cell disks, increasing the disk group size can be accomplished in two steps - griddisk size increase on all storage cells followed by the disk size increase in ASM. This requires a single ASM rebalance operation. If there is no free space in celldisks, some space may be freed up from other disk group(s) as shown in the example.

Note that reducing starts with reducing the disks size in ASM, followed by reducing the griddisks size. The increase starts with the griddisks size increase, followed by increasing the disks size in ASM.


Document id- 1684112.1

Friday, May 19, 2023

ASM Cluster File System Snapshots on Exadata

 ASM Cluster File System Snapshots on Exadata


Database snapshots are a regularly required feature of any application development project. With Oracle Database and on Oracle Exadata, there are many ways of creating and maintaining database clones or copies, including PDB Clones, Full Database Clones, Exadata Sparse Clones, and now ACFS Snapshot Clones on Exadata!

Database clones are needed to allow organizations to test and develop against production-like database environments. Sometimes the volume of data is important, other times less so. Sometimes each developer should have (or wants) a separate environment for their work before code is moved into system test, integration, performance test environments. Some use cases for database clones may have nothing to do with development or testing — at least not in the IT sense of these terms — some organizations may want to furnish their analysts with a database for what/if analysis or model training, tuning, etc without impacting their production database. There are many reasons why a database clone may be required, and as I mentioned above, there are many different ways of supporting this requirement on Exadata.

The ASM Cluster File System (ACFS) is a POSIX compliant general-purpose file system that can also be used to house database files on Exadata. ACFS supports advanced snapshot capabilities similar to third-party copy-on-write style filesystem snapshots. Of particular note when using ACFS Snapshots, customers can create read-write test masters spanning multiple timelines.

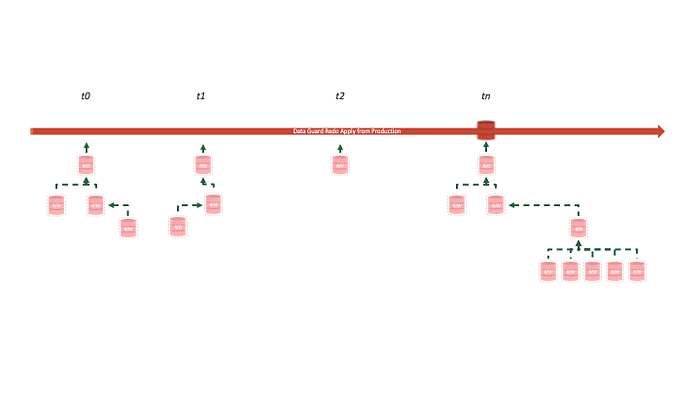
Conceptually, something like the following is possible:

Let’s unpack that a little.

Firstly, to use ACFS Snapshots, you need to have a database — say a Data Guard Standby Database — on ACFS. You could also use gDBClone or use RMAN to create a duplicate database on ACFS. ACFS Snapshots are filesystem snapshots, unlike Exadata Sparse Clones which are sparse files that point back to a read-only datafile.

Once you have a “source” database, you would then stop redo apply, create an ACFS Snapshot — a Test Master in the above diagram — and then restart redo apply in the standby database.

What’s happening now is the ACFS Snapshot is static, but the standby is moving forward again as the primary database sends redo to it. As the standby moves forward ACFS is copying changed blocks into the snapshot directory so the “original” image of the block is available for queries and DML. Note that the initial snapshot level is read-only.

You can then create multiple read-write ACFS Snapshots and database instances with which to use the datafiles. These can in turn can be a read-write “Test Master” for subsequent read-write snapshots and databases.

If you have started with a Data Guard Standby Database, you can repeat the process of stopping redo apply, creating a new ACFS Snapshot — at the current time — and restarting redo apply, allowing multiple timelines to exist simultaneously using the same Standby as the ultimate source of data blocks.

Another way of presenting this is as follows. The opaque database at the top is our Standby Database on ACFS that continually moves forward in time as it receives and applies redo. At various intervals, ACFS Snapshots are created to act as a read-only Test Master, and then multiple snapshots at varying levels are created for use as read-only or read-write snapshot databases.

A few important points to make:

  • ACFS on Exadata supports only the Exadata Flash Cache — features such as (but not limited to) Smart Scan, Storage Indexes, Persistent Memory Data and Commit Accelerators are not available to databases located on ACFS
  • ACFS Snapshots on Exadata are for Dev/Test only
  • Oracle Grid Infrastructure 19.10 (with performance patches) or higher is required. Grid Infrastructure 19.11 is recommended
  • ACFS Encryption is NOT supported for database data files — if you need to encrypt data in any Oracle Database, you should use Transparent Data Encryption.
  • ACFS Snapshots support all types of Oracle Database:
    — CDB Databases and all Plugable Databases in said CDB
    — Individual Pluggable Databases
    — Non-CDB Databases
  • If you’re using Data Guard with ACFS, make sure you have a “true” DR Data Guard Standby Database on ASM. If you need to failover to DR, you don’t want to lose all the Exadata performance features.
  • For highest availability, the ASM diskgroups that the ACFS Filesystems are created from should be High Redundancy diskgroups
  • Do not use ACFS for database homes, encryption wallets, diagnostics, or audit destinations
  • Do not co-locate dev/test databases with production databases on the same RAC or VM Cluster

You can find more on ACFS Snapshots and Exadata Sparse Clones in this presentation from the MAA Team

These MOS Notes and documentation links are also well worth checking out as you get stuck into creating database clones.

I’d like to thank the MAA, Exadata, and of course ACFS development teams for all the work that has gone into delivering and testing ACFS Snapshots on Exadata.

Let us know what you think about ACFS Snapshots and Exadata Sparse Clones in the comments below.

Happy snapshotting!

Reference - Oracle blog

April 2023 Update Available for ECC


April 2023 Update Available for ECC

Enterprise Command Center development colleagues have recently announced the April 2023 update of the Oracle E-Business Suite Enterprise Command Centers (ECC). This is the tenth since the Enterprise Command Centers were introduced in October 2018. 


Overall, there are now 35 Enterprise Command Centers with more than 140 role-based dashboards for the following Oracle E-Business products:

  • Financial Management: Receivables, iReceivables, Payables, Assets, Lease Contracts (Financials), Lease and Finance Management
  • Order Management and Logistics: Order Management, Inventory Management, Advanced Pricing, iStore, Landed Cost Management, Channel Revenue Management, Incentive Compensation
  • Asset Lifecycle and Service: Enterprise Asset Management, Asset Tracking, Service Contracts, Service (TeleService), Field Service, Depot Repair
  • Procurement and Projects: iProcurement, Procurement, Projects, Project Procurement, Contract Lifecycle Management for Public Sector
  • Manufacturing: Discrete Manufacturing, Process Manufacturing,Outsourced Manufacturing, Project Manufacturing, Cost Management, Quality, Bills of Material
  • Human Capital Management: Human Resources, Payroll

What's New with the ECC April 2023 Update?

The April 2023 update delivers many new functional and UI capabilities that Oracle E-Business Suite customers can use to enhance and extend current business processes. These include 11 new dashboards (*), enhancements to existing dashboards, power user personalization, enhancements to the ECC Framework, and more

Jan 2023 Updates to EBS Technology Codelevel Checker (ETCC)


Jan 2023 Updates to EBS Technology Codelevel Checker (ETCC)

The E-Business Suite Technology Codelevel Checker (ETCC) utility identifies patches that need to be applied to your Oracle E-Business Suite 12.2 technology stack for the application and database tiers.

beginning with the ETCC update for the January 2023 proactive patch updates there will be two MOS notes for the consolidated list of patches and bug fixes:  one for the Oracle Fusion Middleware and one for the Oracle Database.

The following are links to the new EBS FMW consolidated list of patches and bug fixes and the updated EBS Database consolidated list of patches and bug fixes:

Note:  How ETCC works remains the same with this update to the documentation.  

Latest Updates

ETCC has been updated to include bug fixes and patching combinations for the following recommended versions and platforms:

Fusion Middleware (All Platforms)

  • WebLogic Patch Set Update 10.3.6.0.230117
  • Oracle Fusion Middleware 11.1.1.9
  • Forms and Reports 10.1.2.3.2

Database (Linux Only)

  • Oracle Database Release Update RU 19.18.0.0.230117
  • Oracle JavaVM Component Database RU 19.18.0.0.230117
  • Oracle Database Proactive BP 12.1.0.2.230117
  • Oracle Database PSU 12.1.0.2.230117
  • Oracle JavaVM Component Database PSU 12.1.0.2.230117
  • Oracle Database Patch for Exadata BP 11.2.0.4.230117
  • Oracle Database PSU 11.2.0.4.230117
  • Oracle JavaVM Component Database PSU 11.2.0.4.230117

Obtaining ETCC

We recommend using the latest version of ETCC, as new bugfixes will not be checked by prior versions of the utility. The latest version of the ETCC tool can always be downloaded via Patch 17537119 from My Oracle Support.

ETCC-Jan-2023-Part-1

References