Showing posts with label OEM. Show all posts

Tuesday, October 6, 2026

How to Add an Email Address for Alerts in Oracle OEM 13c

How to Add an Email Address for Alerts in Oracle Enterprise Manager 13c

By Punit Kumar | Oracle DBA & Monitoring

Reliable monitoring includes making sure the right person receives the alert. When a new DBA joins the team or an on-call contact changes, email delivery should be part of the operational handover.

This guide covers recipient setup, notification schedules, incident rules, and delivery checks. Menu labels may vary slightly by release; the instructions follow Oracle OEM 13c Release 5 documentation.

Check all three: the email address, notification schedule, and incident rule. Adding an address alone does not complete alert routing.

1. Add the Email Address

  1. Open your username menu and select Enterprise Manager Password & Email.
  2. Click Add Another Row and enter the address.
  3. Choose Email (Long) for detailed notifications.
  4. Click Apply.

For another administrator, a Super Administrator can update the email under Setup → Security → Administrators.

2. Check the Notification Schedule

Go to Setup → Notifications → My Notification Schedule. Include the new address in the required time periods and save.

Match the coverage to the support arrangement. Choose 24×7 delivery when continuous coverage is required, or agree on the appropriate periods with the on-call team.

3. Update the Incident Rule

Navigate to Setup → Incidents → Incident Rules.

  1. Edit the relevant rule set and verify its target scope.
  2. Select the appropriate rule and edit its notification action.
  3. Add the OEM administrator account to the email recipients, using the appropriate Email To or Email Cc field.
  4. Review the event type, severity, and action conditions.
  5. Complete the wizard and save the rule set.

Recipients need appropriate privileges for the underlying targets or events. The person editing the rule also needs the required rule-set permissions.

4. Verify the Mail Server

Open Setup → Notifications → Mail Servers and use Test Mail Servers. SMTP configuration requires Super Administrator privileges. Its sender address is separate from the alert recipient.

A successful mail-server test is only one part of validation. Confirm that the intended alert also reaches the expected inbox.

5. Troubleshoot Missing Emails

Symptom Suggested Check
Mail-server test fails Ask the mail team to check relay access, authentication, connectivity, and the test timestamp.
Only the new recipient misses alerts Recheck the address, schedule, recipient selection, and spam or quarantine folders.
Test mail arrives, but alerts do not Review target scope, event criteria, severity, action conditions, and recipient privileges.
Warning emails are missing The default all-targets incident rule set does not email warnings. Review the relevant conditions.

6. Validate and Document the Change

OEM supports rule-set simulation using existing events to inspect rule behavior. Follow this with a controlled delivery check appropriate to your environment.

  • Record the test target, event, severity, and time.
  • Confirm receipt in the intended inbox.
  • Compare the message with the expected alert.
  • Restore any temporary test settings.
  • Record the outcome in the change ticket or team runbook.

Avoid disrupting production simply to generate an alert. Use an approved test environment or an appropriate naturally occurring event.

Oracle References

Wednesday, December 18, 2024

How to Change the Oracle OEM Domain in a URL

 How to Change the Oracle OEM Domain in a URL


Oracle Enterprise Manager (OEM) is a robust tool used for monitoring and managing Oracle environments. Occasionally, you may need to update the domain name in the OEM URL, such as when transitioning to a new network, updating a Fully Qualified Domain Name (FQDN), or integrating with new DNS settings. This blog outlines the step-by-step process to change the domain name in the OEM URL.


Why Change the OEM Domain?

There are several reasons you might need to update the domain in the OEM URL:

  • Network migration: Moving OEM to a new network.

  • Domain standardization: Aligning with organizational naming conventions.

  • SSL updates: Adopting a new domain for secure connections.

For example, changing the URL from 

https://oem.old-domain.com:7801/em   to 

https://oem.new-domain.com:7801/em.

Steps to Change the Domain

Step 1: Update Hostname in Configuration Files

  1. Locate the OEM Configuration Directory: Navigate to the configuration directory in your Oracle Management Service (OMS) installation:

    cd $OMS_HOME/sysman/config
  2. Modify the emoms.properties File: Open the emoms.properties file:

    vi emoms.properties

    Update the URL to reflect the new domain:

    oracle.sysman.eml.mntr.emdURL=https://<new-domain>:<port>/emd/main

    Save and exit the file.

  3. Check the emomslogging.properties File: Review this file for any references to the old domain and update them if needed.

  4. Backup Configuration Files: Before proceeding further, ensure that you back up all configuration files in the directory:

    cp *.properties /backup/location/

Step 2: Update the WebLogic Server Configuration

  1. Access the WebLogic Admin Console: Navigate to the WebLogic Admin Console at:

    http://<current-domain>:7001/console

    Log in using your WebLogic admin credentials.

  2. Update the Server URL:

    • Go to Servers > AdminServer > Protocols > HTTP.

    • Update the Listen Address to the new FQDN.

    • Save and apply the changes.

  3. Restart WebLogic Services: Stop and restart the WebLogic Admin and Managed Servers:

    $DOMAIN_HOME/bin/stopWebLogic.sh
    $DOMAIN_HOME/bin/startWebLogic.sh
  4. Verify Changes in WebLogic Logs: Monitor the WebLogic logs to ensure there are no errors during the restart:

    tail -f $DOMAIN_HOME/servers/AdminServer/logs/AdminServer.log

Step 3: Update the Repository Information

  1. Stop OMS:

    $OMS_HOME/bin/emctl stop oms
  2. Update the OMS Configuration: Run the following command to update the domain name in the repository:

    $OMS_HOME/bin/emctl config oms -repos_pwd <repository_password>
  3. Restart OMS:

    $OMS_HOME/bin/emctl start oms
  4. Synchronize Agents: Ensure that all OEM agents are synchronized with the new domain by reconfiguring them:

    <AGENT_HOME>/bin/emctl stop agent
    <AGENT_HOME>/bin/emctl clearstate
    <AGENT_HOME>/bin/emctl start agent

Step 4: Validate the New URL

  1. Access the New OEM URL: Open a browser and visit:

    https://<new-domain>:<port>/em

    Ensure the page loads correctly.

  2. Test Agent Connectivity: Verify that all agents can communicate with the new OMS URL:

    <AGENT_HOME>/bin/emctl status agent
    <AGENT_HOME>/bin/emctl upload
  3. Validate Reporting: Test report generation and dashboard views to ensure the changes did not disrupt critical OEM functionality.


Step 5: Update DNS and SSL Certificates (if Applicable)

  1. Update DNS Records: Ensure the new domain is mapped to the OEM server's IP address in the DNS system.

  2. Regenerate SSL Certificates: If SSL is enabled, regenerate certificates with the new domain name using Oracle Wallet Manager or a tool like OpenSSL. Replace the old certificates on the server.

  3. Restart HTTPS Services: After updating SSL certificates, restart HTTPS services to apply changes:

    $OMS_HOME/bin/emctl secure oms -remove
    $OMS_HOME/bin/emctl secure oms -enable

Verification

  1. Monitor Logs for Errors: Check the OEM logs for any errors during or after the update:

    tail -f $OMS_HOME/sysman/log/emctl.log
  2. Validate with RMAN: Run an RMAN validation to ensure no issues in agent communication:

    RMAN> BACKUP VALIDATE CHECK LOGICAL DATABASE;
  3. Perform a Full System Health Check:

    • Run a database diagnostic check using OEM.

    • Confirm all critical alerts and notifications are working as expected.


Best Practices to Prevent Future Issues

  • Backup Configuration Files Regularly: Always take a backup before making any configuration changes.

  • Monitor Undo Tablespace and Redo Logs: Maintain sufficient space to avoid database corruption during recovery.

  • Apply Oracle Patches: Keep your Oracle environment updated with the latest patches.

  • Document Changes: Maintain detailed documentation of all changes made to facilitate troubleshooting and audits.


By following these steps, you can seamlessly change the domain name in the Oracle OEM URL while ensuring minimal disruption to monitoring and management activities. 

Tuesday, February 27, 2024

EM 12c, 13c: 'CPU Utilization (%) of a cpu' Metric Showing 'No data to display' On All Metrics In EM Console

 EM 12c, 13c: 'CPU Utilization (%) of a cpu' Metric Showing 'No data to display' On All Metrics In EM Console


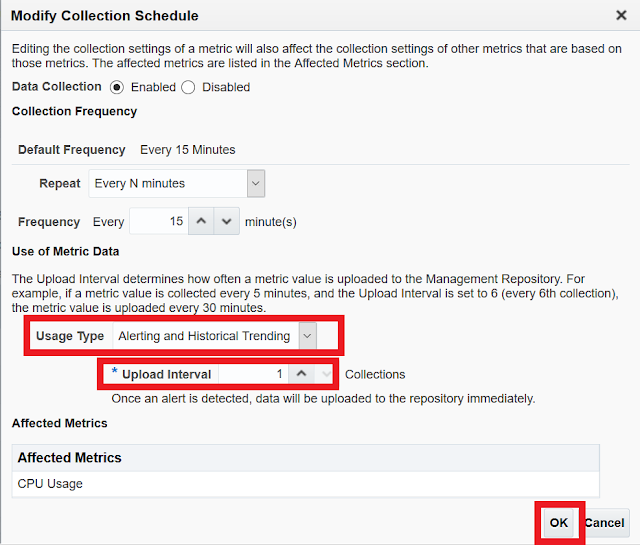
Login to OEM Console -> Navigate to the Host target -> Monitoring -> All Metrics -> Expand "CPU Usage" -> Select "CPU Utilization (%) of a CPU" -> Select Last 24 Hours next to "View Data"

Last 24 hours' Graphs Data for the "CPU Utilization (%) of a CPU" metric of Host Target is Not Being Displayed in OEM Cloud Control.


 'Usage Type' of 'Use of Metric Data' is setting "Alerting Only".

⇒This setting means, 'Upload Interval' of this metric is「On Alert].


SOLUTION 


1) Change 'Usage Type' of 'Use of Metric Data' is setting from "Alerting Only" to "Alerting and Historical Trending".

2)'Upload Interval' setting  a value except "0". ※The number must be greater than or equal to 1.

3) Click the "OK" button.

4) Wait for 15 minutes and verify the  EM Console, it will show metrics data.


※It can be changed too, in the following in EM console.

Login to OEM Console -> Navigate to the Host target -> Monitoring -> Metric and Collection Settings -> Edit Collection Settings: <Metric_name>


Document ID - 2630530.1

Monday, December 27, 2021

EM 12c, EM 13c: How to Verify the Plugins Deployed on the Enterprise Manager Cloud Control OMS and Agent

 EM 12c, EM 13c: How to Verify the Plugins Deployed on the Enterprise Manager Cloud Control OMS and Agent


There are three methods to determine the plugins installed with the EM OMS.

1. Using the emcli command

Log in to the emcli utility by executing the following command from the OMS <ORACLE_HOME>/bin directory

$ ./emcli login -username=sysman

 
Sync the emcli with the repository:

$ ./emcli sync

 
Execute the list plugins commands:

$ ./emcli list_plugins_on_server


Example:

> ./emcli list_plugins_on_server

OMS name is wccaloem01.wcmbp.pri:4889_Management_Service

Plug-in Name                                 Plugin-id                     Version [revision]


Oracle Cloud Framework                       oracle.sysman.cfw             13.3.1.0.0

Oracle Database                              oracle.sysman.db              13.3.1.0.0

Oracle Fusion Middleware                     oracle.sysman.emas            13.3.1.0.0

Systems Infrastructure                       oracle.sysman.si              13.3.1.0.0

Oracle Exadata                               oracle.sysman.xa              13.3.1.0.0


2. From the repository database

Login to repository database as SYSMAN user and execute the following query:

SQL> SELECT epv.plugin_id, epv.version FROM em_plugin_version epv, em_current_deployed_plugin ecp WHERE epv.plugin_type NOT IN ( 'BUILT_IN_TARGET_TYPE' , 'INSTALL_HOME') AND ecp.dest_type='2' AND epv.plugin_version_id = ecp.plugin_version_id;

Sample Output:

PLUGIN_ID            VERSION

-------------------- --------------------------------

oracle.sysman.cfw    13.3.1.0.0

oracle.sysman.emas   13.3.1.0.0

oracle.sysman.si     13.3.1.0.0

oracle.sysman.db     13.3.1.0.0

oracle.sysman.xa     13.3.1.0.0

6 rows selected.

3. From OEM Console

1. Login to OEM console
2. Navigate to Setup --> Extensibility --> Plug-ins
3. Highlight the required plugin, from the Actions menu, click on "Information"
4. In the page displayed, click on "Management Servers" tab, look for the plugin version in column "Currently Deployed Plug-in Version

There are also three methods for determining the plugins installed with the 12.1.0.1 Management Agent:

1. Using the emcli command

Log in to the emcli utility by executing the following command from the OMS <ORACLE_HOME>/bin directory

$ ./emcli login -username=sysman


Sync the emcli with the repository:

$ ./emcli sync


Execute the list plugins commands: 

$ ./emcli list_plugins_on_agent -agent_names="<agent hostname:port>"


2. Using the emctl command ( As Agent Install User)

<AGENT_HOME>/bin> ./emctl listplugins agent

Example:

 ./emctl listplugins agent


Note that the same commands will apply to retrieving similar information from the EM 13c Cloud Control OMS and Agent.

3. From OEM Console

1. Login to OEM console
2. Navigate to Setup --> Extensibility --> Plug-ins
3. Highlight the required plugin, from the Actions menu, click on "Information"
4. In the page displayed, click on "Management Agents" tab, look for the plugin version in column "Plug-in Version on Management Agent"


ORACLE DOC ID - 1431103.1

Wednesday, November 3, 2021

EM 13c: Database Patch Validation Fails at Multiple Checks with Error "actions.xml with Version field of the component "delete" in actions file cannot be or empty"

 EM 13c: Database Patch Validation Fails at Multiple Checks with Error "actions.xml with Version field of the component "delete" in actions file cannot be <null> or empty"


From EM 13c Console, Database Patch plan validation steps fails with the following errors in JobStepsLog_Run_Prerequisite_Checks log file:

Performing check for CheckSystemCommandAvailable
Are all system commands available?
Check complete. The overall result of this check is: Not executed <<<<

Check complete: Not executed <<<<
/tmp/p27547329_600000000009300_226_0/oracle/27547329/27547329/etc/config/actions.xml with Version field of the component "delete" in actions file cannot be or empty. Please check patch metadata.
Recommendation: Check if the commands are in the environment variable "PATH", or specify them in a property file.

Performing check for CheckSystemSpace
Does the system have enough space?
Check complete. The overall result of this check is: Not executed <<<<

Check complete: Not executed <<<<
/tmp/p27547329_600000000009300_226_0/oracle/27547329/27547329/etc/config/actions.xml with Version field of the component "delete" in actions file cannot be or empty. Please check patch metadata.
Recommendation: Create some free space and try again.


CAUSE 

Required OPatch is not available in the software library.


SOLUTION

Verify the patch readme and load the required OPatch ( Patch 6880880 ) into the software library.

Create a new patch plan.

Thursday, August 22, 2019

OEM 13c Port Details

OEM 13c Port Details


Enterprise Manager Central Console Http SSL Port=7802
Enterprise Manager Upload Http Port=4889
Enterprise Manager Upload Http SSL Port=4903
OHS Http Port=9788
BI Publisher Http Port=9701
Node Manager Http SSL Port=7403
BI Publisher Http SSL Port=9803
OHS Http SSL Port=9851
Managed Server Http Port=7202
Oracle Management Agent Port=3872
Enterprise Manager Central Console Http Port=7788
Admin Server Http SSL Port=7102
Managed Server Http SSL Port=7301


Diagram showing ports details for OEM 13C


OEM 13C PORTS
ports are divided into 4 Categories
-----------------------------------------


  1. Agent and OMS: This is the communication between the targets’ agents to OMS.
  2. Browser and OMS: This is browser traffic to OMS.
  3. Internal within OMS: This is communication internal to OMS only.
  4. OMS and OMR: This is repository traffic from the OMS to the OMR.
  5. Workstations and OMR: You still need to access the OMR database from your workstations.
Recommended Port Range
Chosen Port
Purpose
Initiator
Used?
Comments
Agent and OMS
22
OMS to ssh to target hosts.
OMS
YES
Can be revoked after agent deployment.
3872, 1830-1849
3872
Oracle Management Agent port
OMS
YES
4889-4898
4889
Enterprise Manager Upload Http port
Agent
NO
Locked by default
1159, 4899-4908
4903
Enterprise Manager Upload Http SSL port
Agent
YES
Browser and OMS
80
http
Browser
YES
443
https
Browser
YES
7101-7200
7102
Admin Server Http SSL port
Browser
YES
7788-7798
7788
Enterprise Manager Central Console Http port
Browser
NO
Locked by default
7799-7809
7802
Enterprise Manager Central Console Http SSL port
Browser
YES
9788, 9751-9800
9788
OHS Http port
Browser
NO
9899, 9851-9900
9851
OHS Http SSL port
Browser
YES
9701, 9701-9750
9701
BI Publisher Http port
Browser
NO
Locked by default
9801, 9801-9850
9803
BI Publisher Http SSL port
Browser
YES
Internal within OMS
7201-7300
7202
Managed Server Http port
???
NO
Rediections between OHS and Weblogic only.
7301-7400
7301
Managed Server Http SSL port
???
YES
Rediections between OHS and Weblogic only.
7401-7500
7403
Node Manager Http SSL port
???
YES
OMS and OMR
1521
Oracle database port
OMS
YES
This port needs to be opened for the hostnames, VIPs, and the SCAN name/IPs.
Workstations and OMR
1521
Oracle database port
Workstations
YES
This port needs to be opened for the hostnames, VIPs, and the SCAN name/IPs.
 Reference - OEM13C_EXPLANATION

External Ports

These ports will be used in every Enterprise Manager 12c installation and will require firewall and/or ACL modifications if your network is restricted.  These are also the components that will be added to your load balancer configuration.

Default Port
Range
Component
Usage
Modify
4889
4889 – 4898
Enterprise Manager OHS Upload HTTP
Agent Communication to OMS (unsecure). Used in load balancer.
To modify after install follow notes 1381030.1 and 1385776.1. Requires changes on all Agents.
1159
1159, 4899 – 4908
Enterprise Manager OHS Upload HTTP SSL
Agent Communication to OMS (secure). Used in load balancer.
To modify after install follow notes 1381030.1 and 1385776.1. Requires changes on all Agents.
7788
7788 – 7798
Enterprise Manager OHS Central Console HTTP (Apache/UI)
Web browser connecting to Cloud Control Console (unsecure). Used in load balancer and for EM CLI.
To modify after install follow notes 1381030.1.
7799
7799 - 7809
Enterprise Manager OHS Central Console HTTP SSL (Apache/UI)
Web browser connecting to Cloud Control Console (secure). Used in load balancer and for EM CLI.
To modify after install follow note 1381030.1.
7101
7101 - 7200
EM Domain WebLogic Admin Server HTTP SSL Port
Cloud Control Admin Server.
To modify after install follow note 1109638.1.
3872
3872, 1830 – 1849
Cloud Control Agent
Only the OMS will connect to this port, to either report changes in the monitoring, submit jobs, or to request real-time statistics.
Port can be provided during Agent install.
If the agent port needs to be changed at a later date this can be done with the following command on the agent:
emctl setproperty agent -name EMD_URL -value https://hostname.domain:port/emd/main/

This will allow the agent to run on the new port, however the target does not get renamed so continues to show the original port.
1521*
Depends on Listener Configuration
Database Targets -  SQL*Net Listener
For Repository database, only the OMS will connect to store management data from
the agents. For all monitored target databases OMS will retrieve information requested by browser clients.
To modify this port for the repository database:
Change the listener.ora file for the EM repository. Restart the listener. Then for every OMS machine using that repository run the following:
emctl stop oms
emctl config oms -store_repos_details -repos_conndesc -repos_user sysman
emctl start oms
emctl config emrep -agent -conn_desc   

To modify this port for monitored targets, change the listener configuration on the target, then update Monitoring Configuration in EM.
7101
7101 - 7200
FMW Targets – Admin Console
Outgoing from OMS, used for managing FMW targets.
To modify after install follow note 1109638.1.
NA
NA
ICMP
Outgoing from OMS to host servers if the Agent is unreachable. Validates if server is up or down.
NA

Internal Ports

These ports are required for internal Enterprise Manager communication and typically do not require additional firewall/ACL configuration.
Default Port
Range
Component
Usage
Modify
7201
7201 – 7300
EM Domain WebLogic Managed Server HTTP Port
Used for Fusion Middleware communication.
Configured during installation
7301
7301 – 7400
EM Domain WebLogic Managed Server HTTP SSL Port
Used for Fusion Middleware communication.
Configured during installation
7401
7401 – 7500
Node Manager HTTP SSL Port
Used for Fusion Middleware communication.
Configured during installation
6702
6100 - 6199
Oracle Notification Server (OPMN) Local
Ports used by OPMN  can be verified from/gc_inst/WebTierIH1
/config /OPMN/opmn/opmn.xml:


Modify the opmn.xml to use free ports as below:
1. Stop OMS
2. Take a backup of the existing opmn.xml and ports.prop in the / gc_inst/WebTierIH1/ config /OPMN/opmn directory.
3. Edit the opmn.xml file, under the element, modify the local / remote port, as necessary to the free port available and save the file.
4. Edit the ports.prop file and modify the remote / local port parameters as necessary and save the file.
5. Start the OMS
6703
6200 - 6201
Oracle Notification Server (OPMN) Remote
Ports used by OPMN  can be verified from/gc_inst/WebTierIH1
/config/OPMN/opmn/opmn.xml:


Modify the opmn.xml to use free ports as below:
1. Stop OMS
2. Take a backup of the existing opmn.xml and ports.prop in the/gc_inst/WebTierIH1/ config/OPMN/opmn directory.
3. Edit the opmn.xml file, under the element, modify the local / remote port, as necessary to the free port available and save the file.
4. Edit the ports.prop file and modify the remote / local port parameters as necessary and save the file.
5. Start the OMS

Optional

These ports required only if certain components are to be used and firewall/ACL changes may be needed.

Default Port
Range
Component
Usage
Modify
443

Secure web connection (https - 443) to updates.oracle.com support.oracle.com
ccr.oracle.com
login.oracle.com
aru-akam.oracle.com
Outgoing from OMS used for online communication with Oracle for OCM, MOS, Patching, Self-Updates, ASR
Proxy settings defined via the UI (Setup -> Proxy Settings)
Do not use the OMS parameters!  
51099

Application Dependency and Performance RMI Registry Port
ADP
Configured during installation
55003

Application Dependency and Performance Java Provider Port
ADP
Configured during installation
55000

Application Dependency and Performance Remote Service Controller Port
ADP
Configured during installation
4210

Listen
ADP
Configured during installation
4211

SSL Listen Port
ADP
Configured during installation
3800

JVM Managed Server Listen
JVM
Configured during installation
3801

JVM Managed Server SSL Listen
JVM
Configured during installation
9701
9701-49152
BI Publisher HTTP
BI Publisher
During install can modify with configureBIP script.  Post-install can be modified per Note 1524248.1
9702
9701-49152
BI Publisher HTTP SSL Port
BI Publisher
During install can modify with configureBIP script.  Post-install can be modified per Note 1524248.1